30 April 2012

Glock18C: Metal Slide and Barrel Mod

This is my first time to disassemble and modify a Tokyo Marui Glock. At first I was kind of nervous or anxious but remembering how other people say that it's very easy, I went on with it.

Just like the 1911, the slide must be taken out of the frame first. The Tokyo Marui Glocks have the same field stripping process as the real Glocks. The slide lock must be pressed down first on both sides of the gun. Then, while holding down the slide lock, pull the slide back, and push it out front.


After that, the recoil spring guide assembly and the barrel assembly can be taken out from the slide.


The inner barrel assembly can now be taken out from the outer barrel.


The screw that joins the two halves of the chamber was undone to access the inner barrel and hop up rubber.


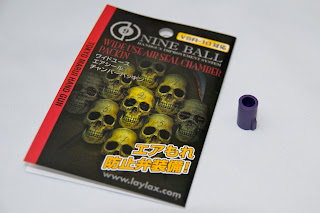
The PDI 6.01 Raven inner barrel and NineBall hop rubber replaced the original Tokyo Marui parts.


The inner barrel assembly was then put together again with the new parts installed.


Then it was oiled on the sides and inserted into the PGC metal outer barrel.


Now the slide was turned upside down and the screw that keeps the selector mechanism, blowback unit and the rear sight was undone.


The part that keeps the selector switch and mechanism in place was then taken out.


Also the selector block (I'm just making up the part names here depending on their function on the gun) and its spring.


Then the selector switch can be removed. This is a bit tricky to do so it's ok to take your time.


After that, the rear sight will just fall off on the other side. The blowback unit can be removed the same way in 1911s. The sides of the slide must be widened and with use of a finger the blowback unit can be pushed out from the slide.


Now the PGC metal slide was prepared by installing its small parts like the dummy extractor plug and the small circular part on the inner rear of the slide (I have no idea what they call it in real steel, I suppose it's an extractor pin. It's a dummy part in airsoft anyway).


The NineBall Tritium sight was screwed into the slide and the blowback unit and selector assembly parts were installed. Everything is just a virtual drop-in.


Now to finish the custom work, the new barrel assembly and the recoil spring guide assembly were put in place. (In the photo below, the recoil spring is still the original Tokyo Marui recoil spring).


26 April 2012

Glock18C Black Custom

I've always wanted to use metal slides on my Glocks. My close friend had told me that installation was easy and that once installed, the sound of the slide racking is just music to the ears. I saw a couple of PGC metal slide and barrel sets in a local airsoft shop and I just couldn't let the opportunity to pass. 


Another part that I'm always keen on replacing is the inner barrel. I opted to use the PDI 6.01 Raven inner barrel as I have heard and read lots of good things about it.


One of the main reasons I got the G18C is its full-auto capability. This pistol was intended for my CQB games and most such games here in Japan were held indoors. Almost always, these game sites would have unlit area where it would be hard to aim your gun if you're using black iron sights or non-glowing sights. So part of the plan really is to put a Tritium sight and the Nineball Tritium sights for Glock are just awesome! 


My usual custom work for pistols would almost always include a hop rubber replacement and this particular custom gun is no exception. I always use the Nineball hop rubber whenever I replace the Tokyo Marui original hop rubber.


Of course, when the plastic slide and barrel are replaced by metal (aluminum) ones, no matter how light the aluminum is, it would tend to be heavier than the plastic parts. Replacing the recoil spring is a must so that the slide cycles well when the gun is fired. In this project I used a RCC 130% recoil spring.

I'm excited to show you the very easy process of changing from a plastic slide to a metal slide. Wait for it on the next post.

Wired out.

23 April 2012

Custom Covert II with Magwell

I really appreciate the function of an enhanced magazine well in a pistol so when I was building the Tactical Entry II, and knowing that it has its own magwell included in the conversion kit, I've decided I'll switch the mainspring housing of the Covert with a Nova mainspring housing with built-in magwell.

 The Nova flat-checkered mainspring housing I originally installed in the Covert and is now in the Tactical Entry II
This is now the Nova mainspring housing installed in the Custom Covert II

Below are photos of the Kimber Custom Covert II with its new mainspring housing installed.


19 April 2012

Magpul-inspired RECCE Rifle


When I saw this photo of Travis Haley (above) when he and Chris Costa were still with Magpul and the Magpul Dynamics training program, I really wanted to replicate his M4 with my airsoft rifle as my base. Having a Tokyo Marui RECCE Rifle, the project seemed to be done easily except I can't use a CTR stock because I wanted to use the SOPMOD battery. So I've decided I would just go for the same "feel" and not the exact look of the gun. So here's my RECCE Rifle now...again, inspired by the photo above.


The parts listed from the last  RECCE Rifle entry were almost the same. I just removed the tactical flashlight and added a Magpul PTS/AAC 51T Blackout Flash hider and the AAC Suppressor (Dark Earth).

16 April 2012

Kimber Tactical Entry II: Photo Gallery

Last April 7 we went to attend a public game and I thought it's a good chance to take photos of my guns in the field, out in the sun - with no artificial light. I brought with me my camera and my customized pistols and my ever-reliable Tokyo Marui RECCE Rifle.

I've taken lots of photos but I was able to select only a few for this blog. In this post are the photos of my Kimber Tactical Entry II that which build process was just concluded a couple of entries ago.